**** This blog article was tested with centos 6. However in centos 7, you might need to install an extra package via "
This post is a rather trivial post, but I just wanted to create a reference that you could use if you are in doubt on which distribution could work. Also I have some other blog post planned for which this would serve as an excellent start guide.
If you want to create a Linux repository and you look at the manual, it will only state
So I decide to test just a major distribution CentOS. The good thing is that they have a minimal version which only installs the bare essentials. In this post, I used "CentOS-6.4-x86_64-minimal". When you boot from the CD you can just go through the installer which is pretty self explanatory. Thus I'll only discuss some of the steps.

At boot I like to tab and add the kernel parameter resolution=1024x768. I've noticed that on a virtual console you are missing part of the screen if you do not do this.

I advice you to set the network settings via the gui. You can do it afterwards directly in the config file but it takes a bit more time. I also enable connect automatically, so that after the install, I can ssh directly to the new server.

For the storage option, select review and modify in the bottom left corner so that you have more control.
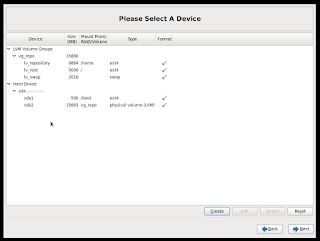
In this step you can see that I downsized the root vol (/) to only 5GB. You will see that this is plenty. In fact I think even 3GB would suffice. I created another vol (/home) to store all the backups in. When your installation is configured it should only install a couple of packages and then you are ready to go.
When your machine is installed and rebooted, you should be able to SSH to the machine, if you configured the network. One thing I like to do is go to the config file of your network and change NM_CONTROLLED=yes to NM_CONTROLLED=no. You can edit the file via

Then when this is done you should install the software that is required. First do an update of the system
Now we will configure the firewall. Veeam requirements say that you need to open certain ports . Mainly this should be
The easiest way at this point (so that you don't have to install extra components) is manipulating the iptables file directly. Just use vi to edit "/etc/sysconfig/iptables" and add the following line between "ssh (--dport 22) " and "-j Reject". The order is important!

Then you can restart the system
In the following step, we will create a group repos. Then we create a user repo01 that is part of this repos group and change the users password. Finally we add the repos groups to a sudoers file so that you don't have to modify the original file nor do you need to allow Veeam to manipulate it.


yum install perl-Data-Dumper". You can follow the discussion on the Veeam forum. Credit goes to Tom Sightler for this update**** This post is a rather trivial post, but I just wanted to create a reference that you could use if you are in doubt on which distribution could work. Also I have some other blog post planned for which this would serve as an excellent start guide.
If you want to create a Linux repository and you look at the manual, it will only state
"Any major Linux distribution"The FAQ on the forum gives a bit more detail stating
"Any storage directly attached to, or mounted on a Linux server (x86 and x64 of all major distributions are supported, must have SSH and Perl installed). The storage can be local disks, directly attached disk based storage (such as USB hard drive), NFS share, or iSCSI/FC SAN LUN in case the server is connected into the SAN fabric."
So I decide to test just a major distribution CentOS. The good thing is that they have a minimal version which only installs the bare essentials. In this post, I used "CentOS-6.4-x86_64-minimal". When you boot from the CD you can just go through the installer which is pretty self explanatory. Thus I'll only discuss some of the steps.

At boot I like to tab and add the kernel parameter resolution=1024x768. I've noticed that on a virtual console you are missing part of the screen if you do not do this.


In this step you can see that I downsized the root vol (/) to only 5GB. You will see that this is plenty. In fact I think even 3GB would suffice. I created another vol (/home) to store all the backups in. When your installation is configured it should only install a couple of packages and then you are ready to go.
When your machine is installed and rebooted, you should be able to SSH to the machine, if you configured the network. One thing I like to do is go to the config file of your network and change NM_CONTROLLED=yes to NM_CONTROLLED=no. You can edit the file via
vi /etc/sysconfig/network-scripts/ifcfg-eth0

Then when this is done you should install the software that is required. First do an update of the system
yum update -yNow install client and server openssh. This should already be done but just in case
yum install -y openssh openssh-clients openssh-serverYou will require sudo for elevating the rights. Notice this should also already be ok
yum install -y sudoFinally install perl. This is not included in the base install
yum install -y perlIf you install it in a VM, for a test, this is the moment you can install VMware Tools. I have this oneliner for installing VMware tools.
mount /dev/cdrom /mnt;tar -xzf /mnt/VMware*.tar.gz -C /usr/src/;/usr/src/vmware-tools-distrib/vmware-install.pl
Now we will configure the firewall. Veeam requirements say that you need to open certain ports . Mainly this should be
- 22 tcp (ssh)
- 2500 - 5000 tcp
The easiest way at this point (so that you don't have to install extra components) is manipulating the iptables file directly. Just use vi to edit "/etc/sysconfig/iptables" and add the following line between "ssh (--dport 22) " and "-j Reject". The order is important!
-A INPUT -m state --state NEW -m tcp -p tcp --dport 2500:5000 -j ACCEPT

Then you can restart the system
service iptables restartFor this tutorial we will create a separate user for the repository. Of course since you allow the user to elevate to sudo it is not 100% secure but it offers a bit of seperation. If you want real seperation, I advise you to create multiple systems or multiple chroot environments.
In the following step, we will create a group repos. Then we create a user repo01 that is part of this repos group and change the users password. Finally we add the repos groups to a sudoers file so that you don't have to modify the original file nor do you need to allow Veeam to manipulate it.
groupadd repos;
useradd -m -G repos repo01;
echo "repo01:repo01" | chpasswd;
echo "%repos ALL=(root) NOPASSWD: ALL" >> /etc/sudoers.d/repos;
Now you should be able to add the repository to Veeam. By default you will see that we are not using too much space. In my example the lv_root was only used for 28% (1.3GB of 4.9GB)
Some interesting screen shots while adding the repository. You can see I don't use the root account because repo01 can elevate its right. You don't need to allow Veeam to alter the sudoers file as this is already been done

You can also see that we have opened up all the required ports

In the repository step, I just used the home folder of repo01 so that the backups are stored nicely in this separate container.

During backups, you will see that Veeam will automatically push and start the necessary agents
