If you are a Veeam fan, you certainly need to read the word of Gostev. Basically you enroll on the forum and every week you will get a mail from the forum containing the word of Gostev. He is the product manager for Backup & Replication and if you want to be the first one to know all about the new stuff in IT (not only Veeam), you'll see that this weekly mail avoids you reading 25 blog articles a day (quote I borrowed from one of my colleagues ;)).
This week wasn't any different. Veeam launched the public beta for the Veeam Explorer for Active Directory. So what is the big difference between the AD AIR wizard and this one? Well you don't need to power on a virtual lab to extract a single user. Instead, Veeam will read the ntds.dit (ad database file) directly via a file level recovery. This reduces recovery time drastically. The coolest part? It's a public beta, so everybody can test it!
So how do you get started? Well you will need a Veeam Backup & Replication server v7 installed. Then you can download the beta via the forums:
http://forums.veeam.com/veeam-backup-replication-f2/veeam-explorer-for-active-directory-t21038.html
Basically, you will get a zip file and in it is an MSI installer you can just next-next-install.

After that you should find the VEAD in your start menu

Now how do you get started? Well like with all explorer beta versions (exchange, sharepoint), you will need to start a file level recovery and point to the database. So lets start with the easy part, the file level recovery. Go to the main menu and choose restore.
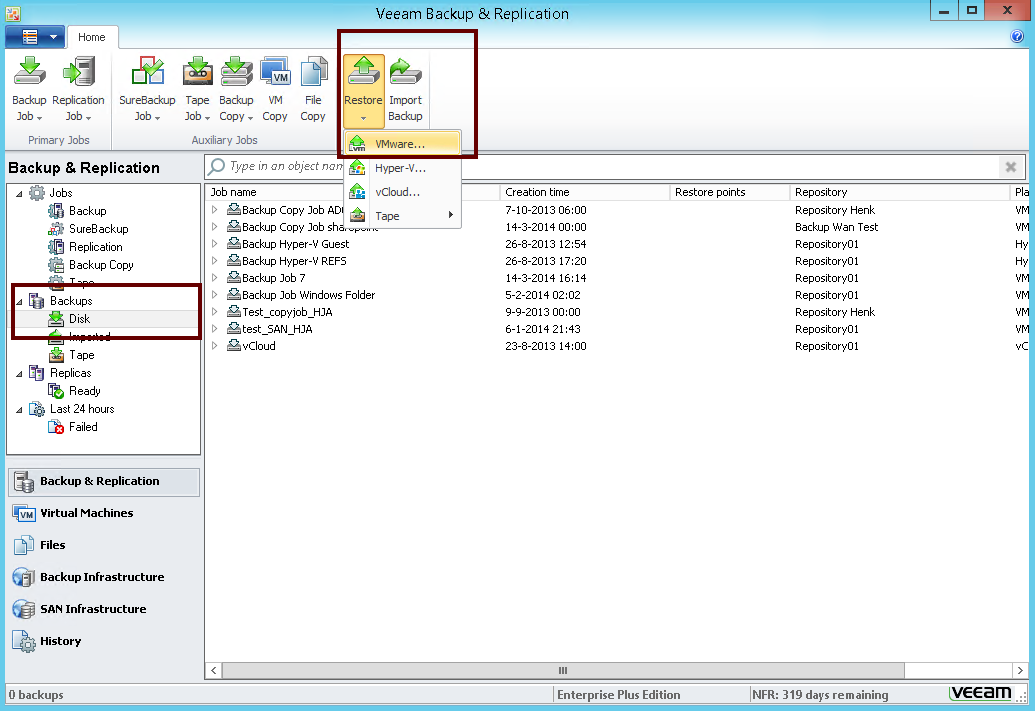
Then choose to do a windows guest file level recovery

Find your active directory server

And start the guest files recovery wizard

Remember when you click finish, the recovery wizard will start but not any files will be actively recovered to your original machine.

Now you should see the file browser. But actually Veeam mounts the file level recovery under:
C:\VeeamFLR\\Volume
In my case the c: drive is
C:\VeeamFLR\ad02\Volume1
Keep the FLR wizard open during the whole process, otherwise Veeam will dismount the disk.
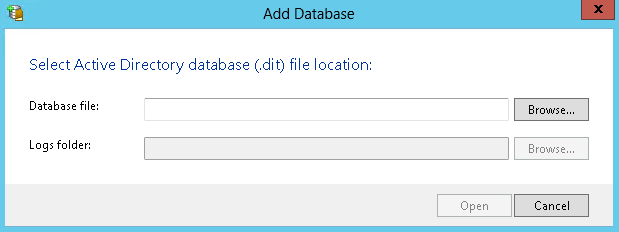
Now start the VEAD and click add database

Now you should point to the the ntds.dit file
I first tried to do a search through "C:\VeeamFLR\ad02\Volume1". This gave me 2 results:

But when I tried to mount the one in system32 I got the following error:

Luckily somebody already posted the solution on the forum. To find the correct path, go to your production server and look into:
HKEY_LOCAL_MACHINE\SYSTEM\CurrentControlSet\Services\NTDS\Parameters
However since my ad02 server is a core server, I created this small script you can invoke remotely to find the path

So this says the file should be under C:\Windows\NTDS\ntds.dit. If we match this to the file level recovery path, we will get something like this:
C:\VeeamFLR\ad02\Volume1\Windows\NTDS\ntds.dit
Now again try to add the database file and point to the correct file:

After loading the db, the VEAD should show you your AD structure:

So lets try to restore a user. First of all you can easily see your attributes by right clicking the user:

 Opening the attributes, I was wondering where they hid the recovery for individual attributes. Well it is actually part of the user recovery wizard. So lets follow the restore wizard:

First define the AD to restore to and the credentials to use

Then specify where to restore the user

In the next step you can decide what to restore

This is the "twist" about the wizard, you can actually recover the user with the password. So if by accident you deleted a user during the night, you can recover him and next day, the end user won't even notice that he was deleted.

Do you want to enable the account? :)

Final step is to click the restore button.
What is also cool is that not only can you restore an individual user, but also a whole OU if required:

Another great thing about it, is that it should be exchange aware. So if you restore a user, it should connect it to the correct mailbox as well.
So have fun playing with the beta! And remember kids, it's a beta, don't test it in production :)
This week wasn't any different. Veeam launched the public beta for the Veeam Explorer for Active Directory. So what is the big difference between the AD AIR wizard and this one? Well you don't need to power on a virtual lab to extract a single user. Instead, Veeam will read the ntds.dit (ad database file) directly via a file level recovery. This reduces recovery time drastically. The coolest part? It's a public beta, so everybody can test it!
So how do you get started? Well you will need a Veeam Backup & Replication server v7 installed. Then you can download the beta via the forums:
http://forums.veeam.com/veeam-backup-replication-f2/veeam-explorer-for-active-directory-t21038.html
Basically, you will get a zip file and in it is an MSI installer you can just next-next-install.
After that you should find the VEAD in your start menu
Then choose to do a windows guest file level recovery
Find your active directory server
And start the guest files recovery wizard
Remember when you click finish, the recovery wizard will start but not any files will be actively recovered to your original machine.
Now you should see the file browser. But actually Veeam mounts the file level recovery under:
C:\VeeamFLR\
In my case the c: drive is
C:\VeeamFLR\ad02\Volume1
Keep the FLR wizard open during the whole process, otherwise Veeam will dismount the disk.
Now start the VEAD and click add database
Now you should point to the the ntds.dit file
I first tried to do a search through "C:\VeeamFLR\ad02\Volume1". This gave me 2 results:
But when I tried to mount the one in system32 I got the following error:
Luckily somebody already posted the solution on the forum. To find the correct path, go to your production server and look into:
HKEY_LOCAL_MACHINE\SYSTEM\CurrentControlSet\Services\NTDS\Parameters
However since my ad02 server is a core server, I created this small script you can invoke remotely to find the path
$server = "ad02"This should show you the correct path under "DSA Database file"
Invoke-Command -computer $server { Get-ItemProperty -path "Registry::HKEY_LOCAL_MACHINE\SYSTEM\CurrentControlSet\Services\NTDS\Parameters\" }
So this says the file should be under C:\Windows\NTDS\ntds.dit. If we match this to the file level recovery path, we will get something like this:
C:\VeeamFLR\ad02\Volume1\Windows\NTDS\ntds.dit
Now again try to add the database file and point to the correct file:
After loading the db, the VEAD should show you your AD structure:
So lets try to restore a user. First of all you can easily see your attributes by right clicking the user:
First define the AD to restore to and the credentials to use
Then specify where to restore the user
In the next step you can decide what to restore
This is the "twist" about the wizard, you can actually recover the user with the password. So if by accident you deleted a user during the night, you can recover him and next day, the end user won't even notice that he was deleted.
Do you want to enable the account? :)
Final step is to click the restore button.
What is also cool is that not only can you restore an individual user, but also a whole OU if required:
Another great thing about it, is that it should be exchange aware. So if you restore a user, it should connect it to the correct mailbox as well.
So have fun playing with the beta! And remember kids, it's a beta, don't test it in production :)
No comments:
Post a Comment
Note: Only a member of this blog may post a comment.